> ## Documentation Index
> Fetch the complete documentation index at: https://developer.qaip.com/docs/llms.txt
> Use this file to discover all available pages before exploring further.
# クイックスタート
> QAIPを使って10分でチャットボットを作成する
## ログイン
[QAIPにログイン](https://developer.qaip.com/dashboard/login)して、Webサイトのチャットボットを作成する準備をしましょう。
 ## Webサイトをクロールする
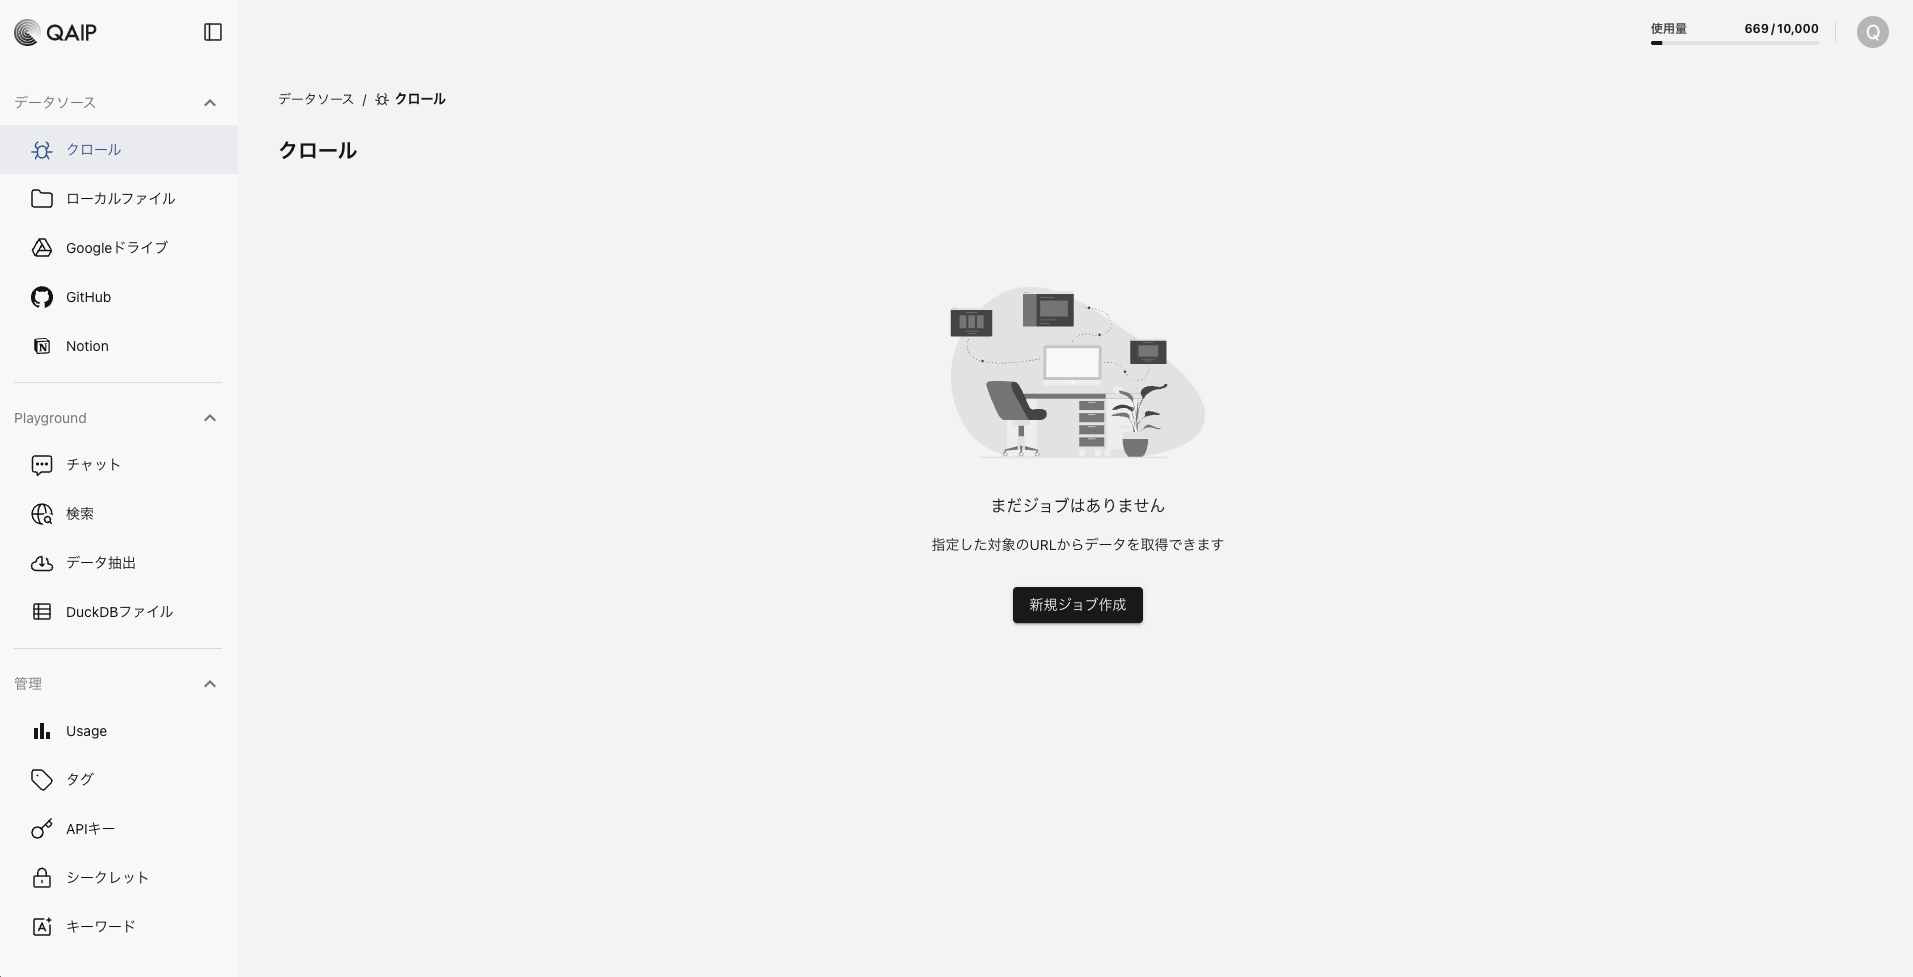
[QAIPのドキュメント](#)をクロールしてみましょう。
## Webサイトをクロールする
[QAIPのドキュメント](#)をクロールしてみましょう。
画面中央の「新規ジョブ作成」をクリックします。
URLに「 [https://developer.qaip.com/docs](https://developer.qaip.com/docs) 」を入力し、「保存する」をクリックします。
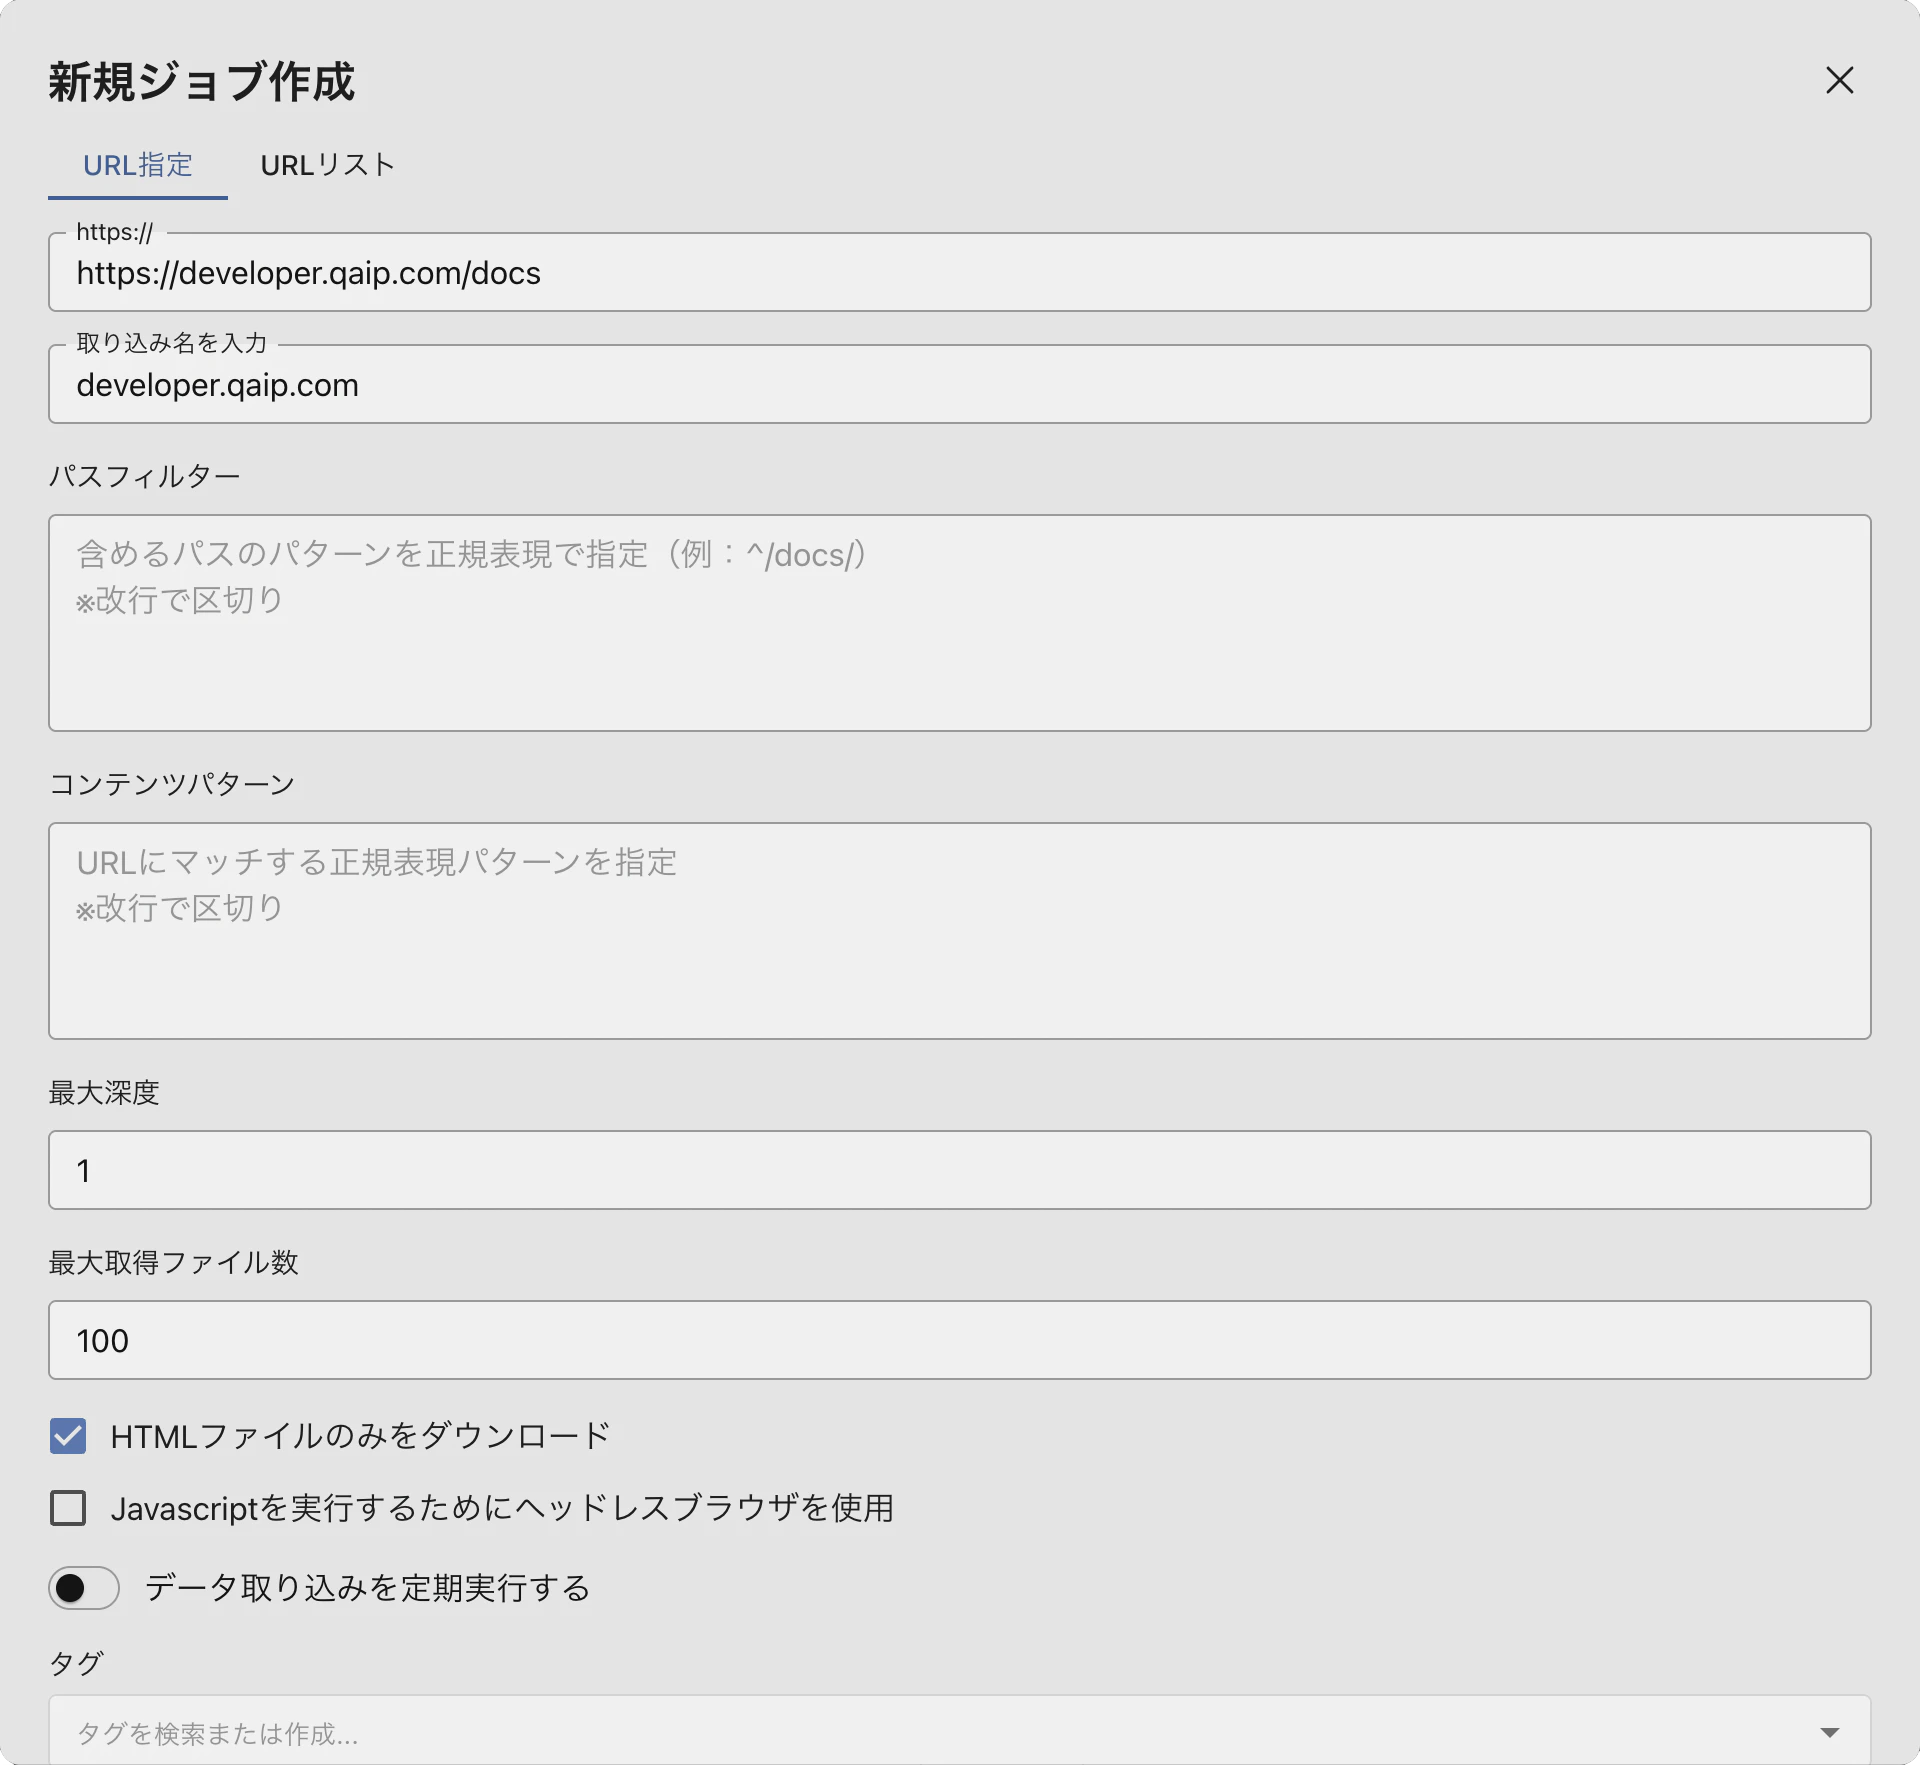 約3分でクロールのステータスが「Success」になります。
## 質問してみる
それでは早速質問してみましょう。サイドバーから「チャット」を選択し、以下のように入力します。
約3分でクロールのステータスが「Success」になります。
## 質問してみる
それでは早速質問してみましょう。サイドバーから「チャット」を選択し、以下のように入力します。
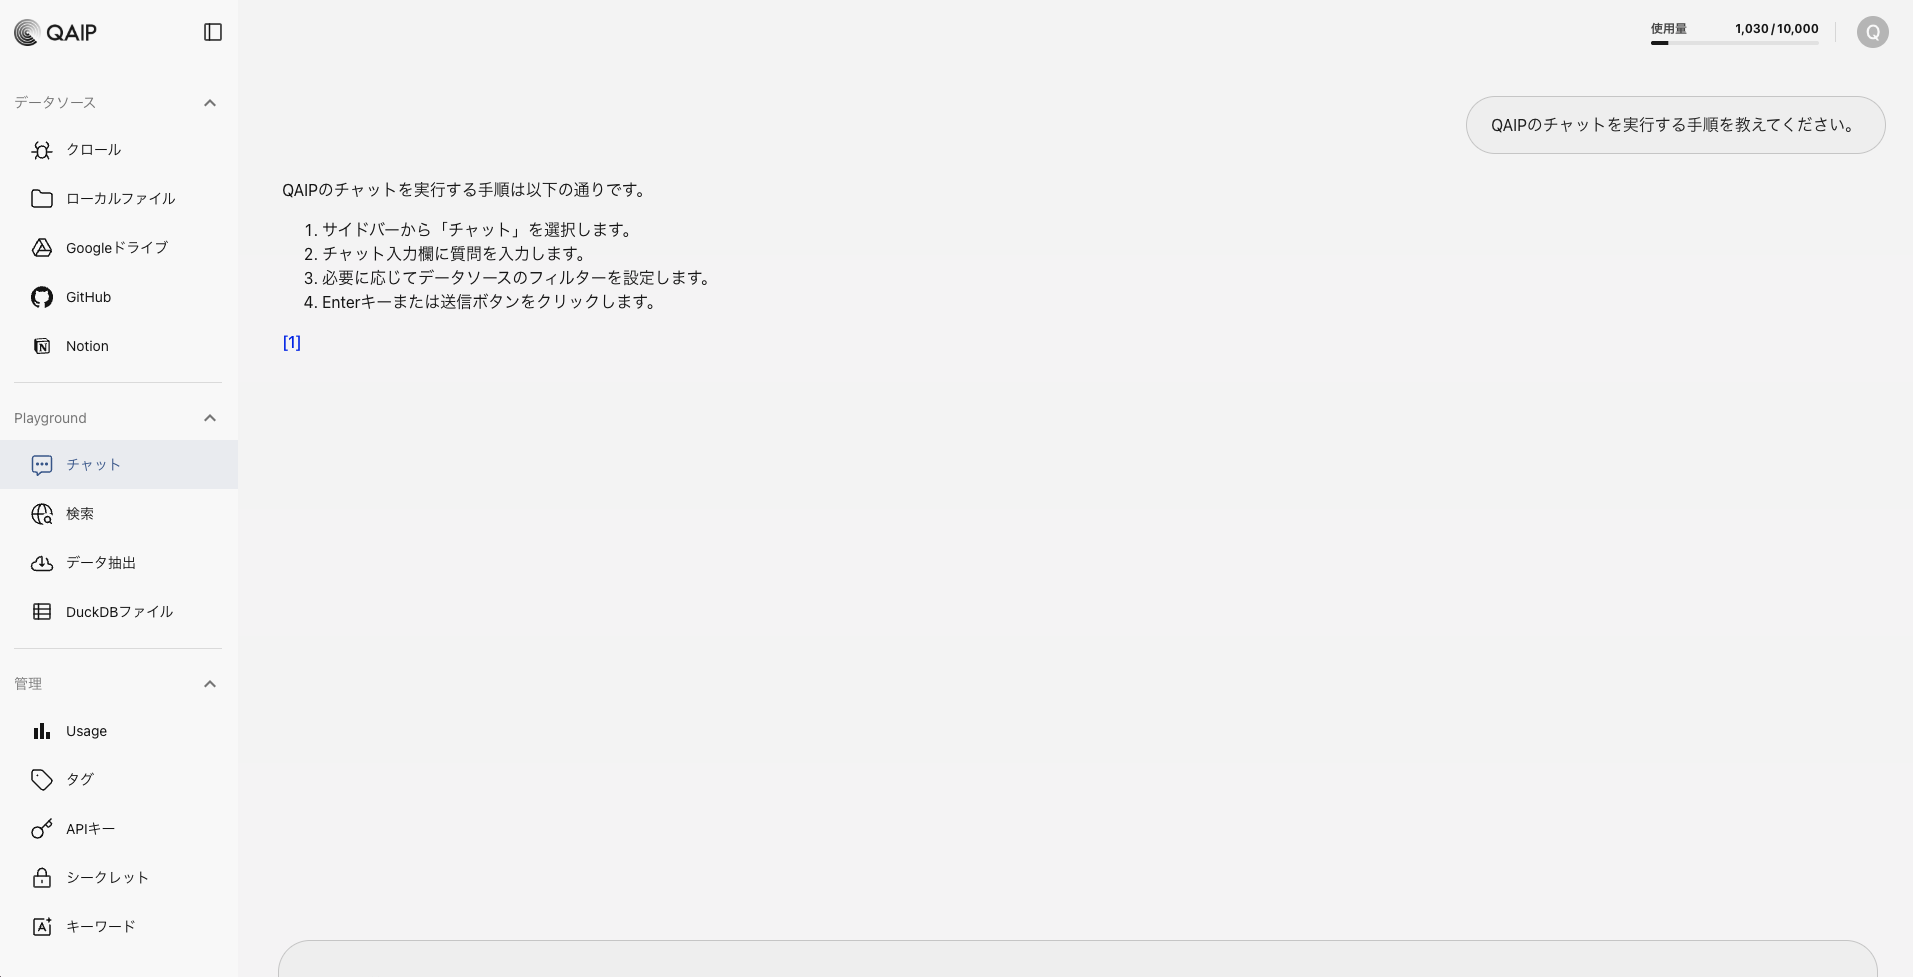 これでチャットボットが完成しました🎉
## 外部に公開する
### APIキーの発行
APIキーを発行して、チャットボットを自由に呼び出せるようにしましょう。
これでチャットボットが完成しました🎉
## 外部に公開する
### APIキーの発行
APIキーを発行して、チャットボットを自由に呼び出せるようにしましょう。
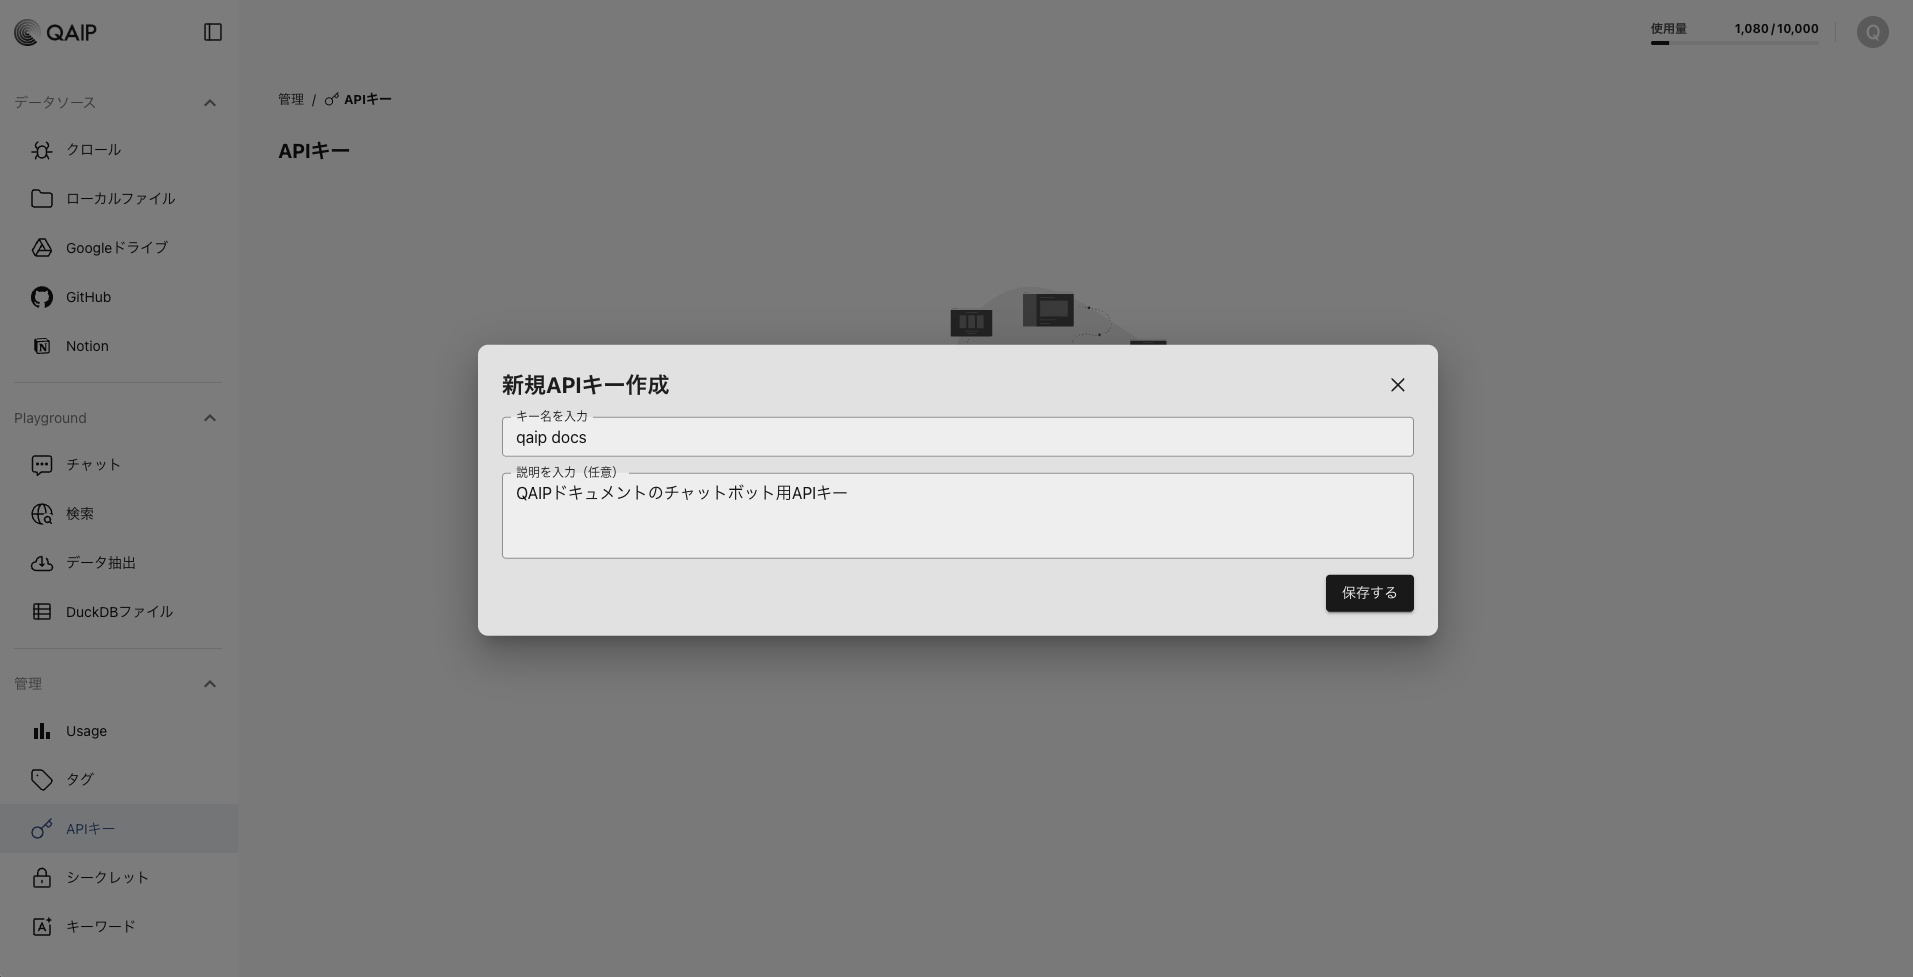
サイドバーから「APIキー」を選択し、画面中央の「新規APIキー作成」をクリックします。
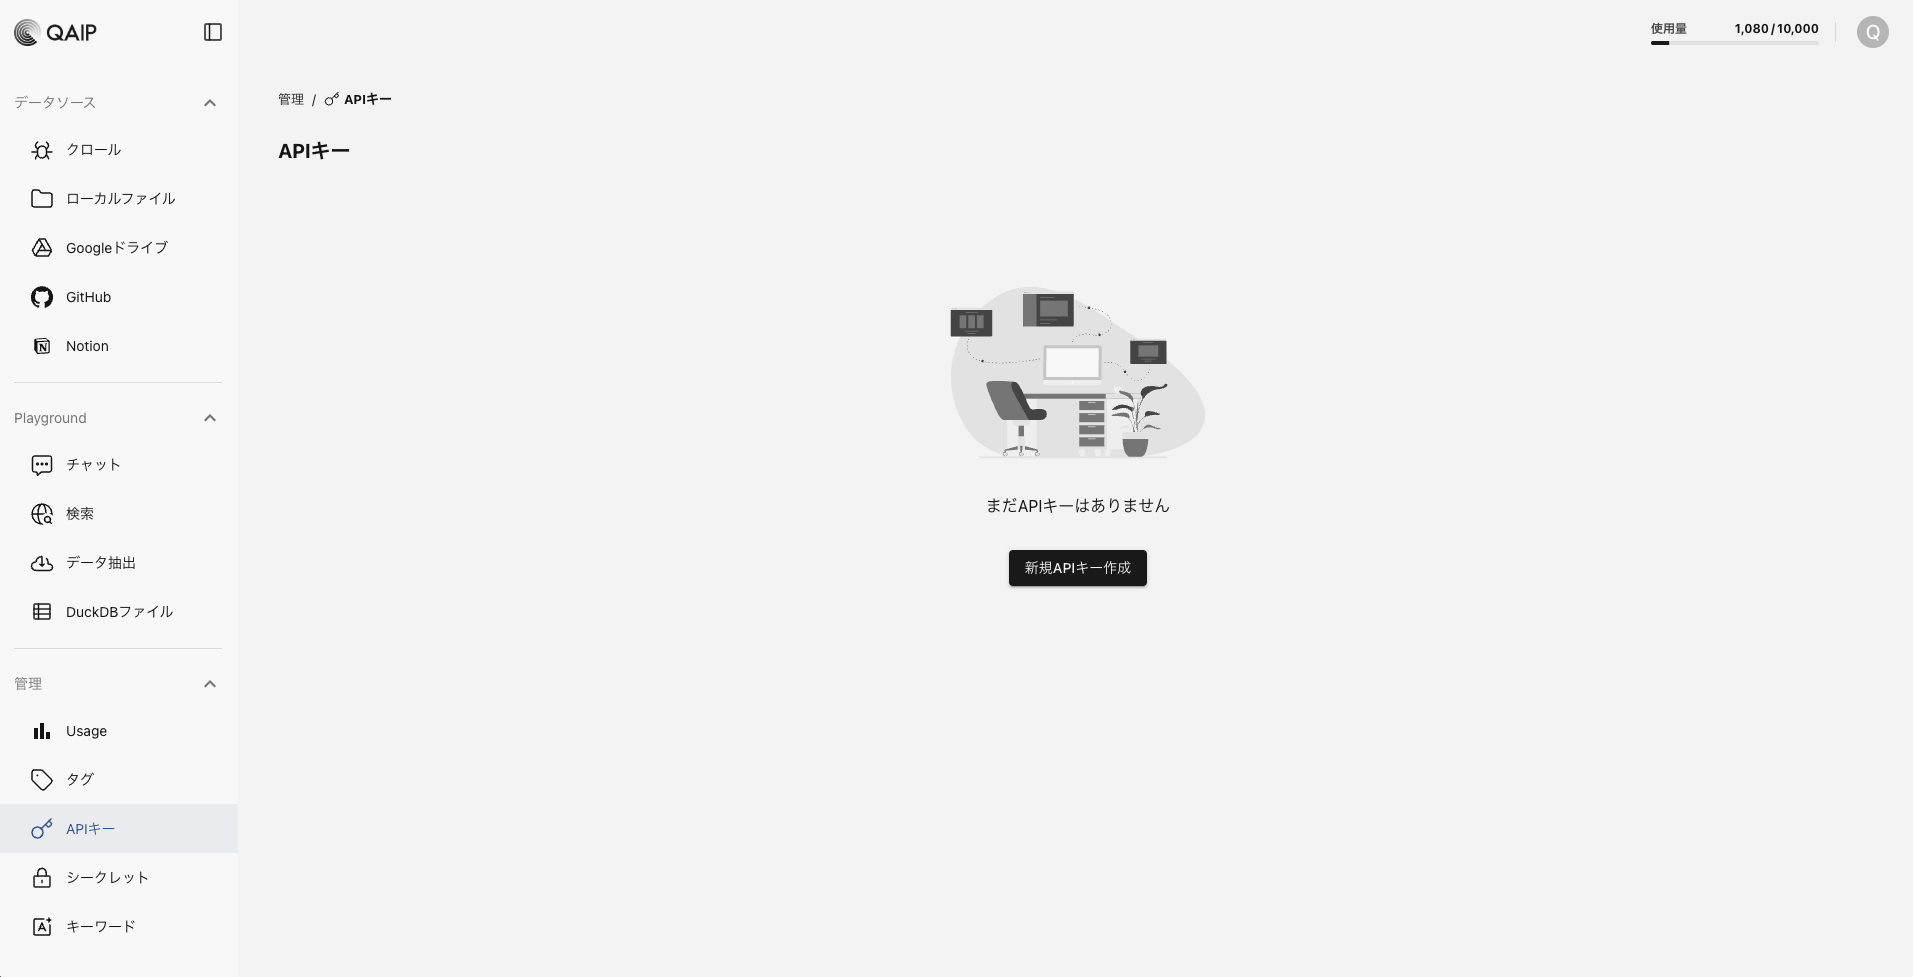 名前と説明を入力し、「保存する」をクリックします。
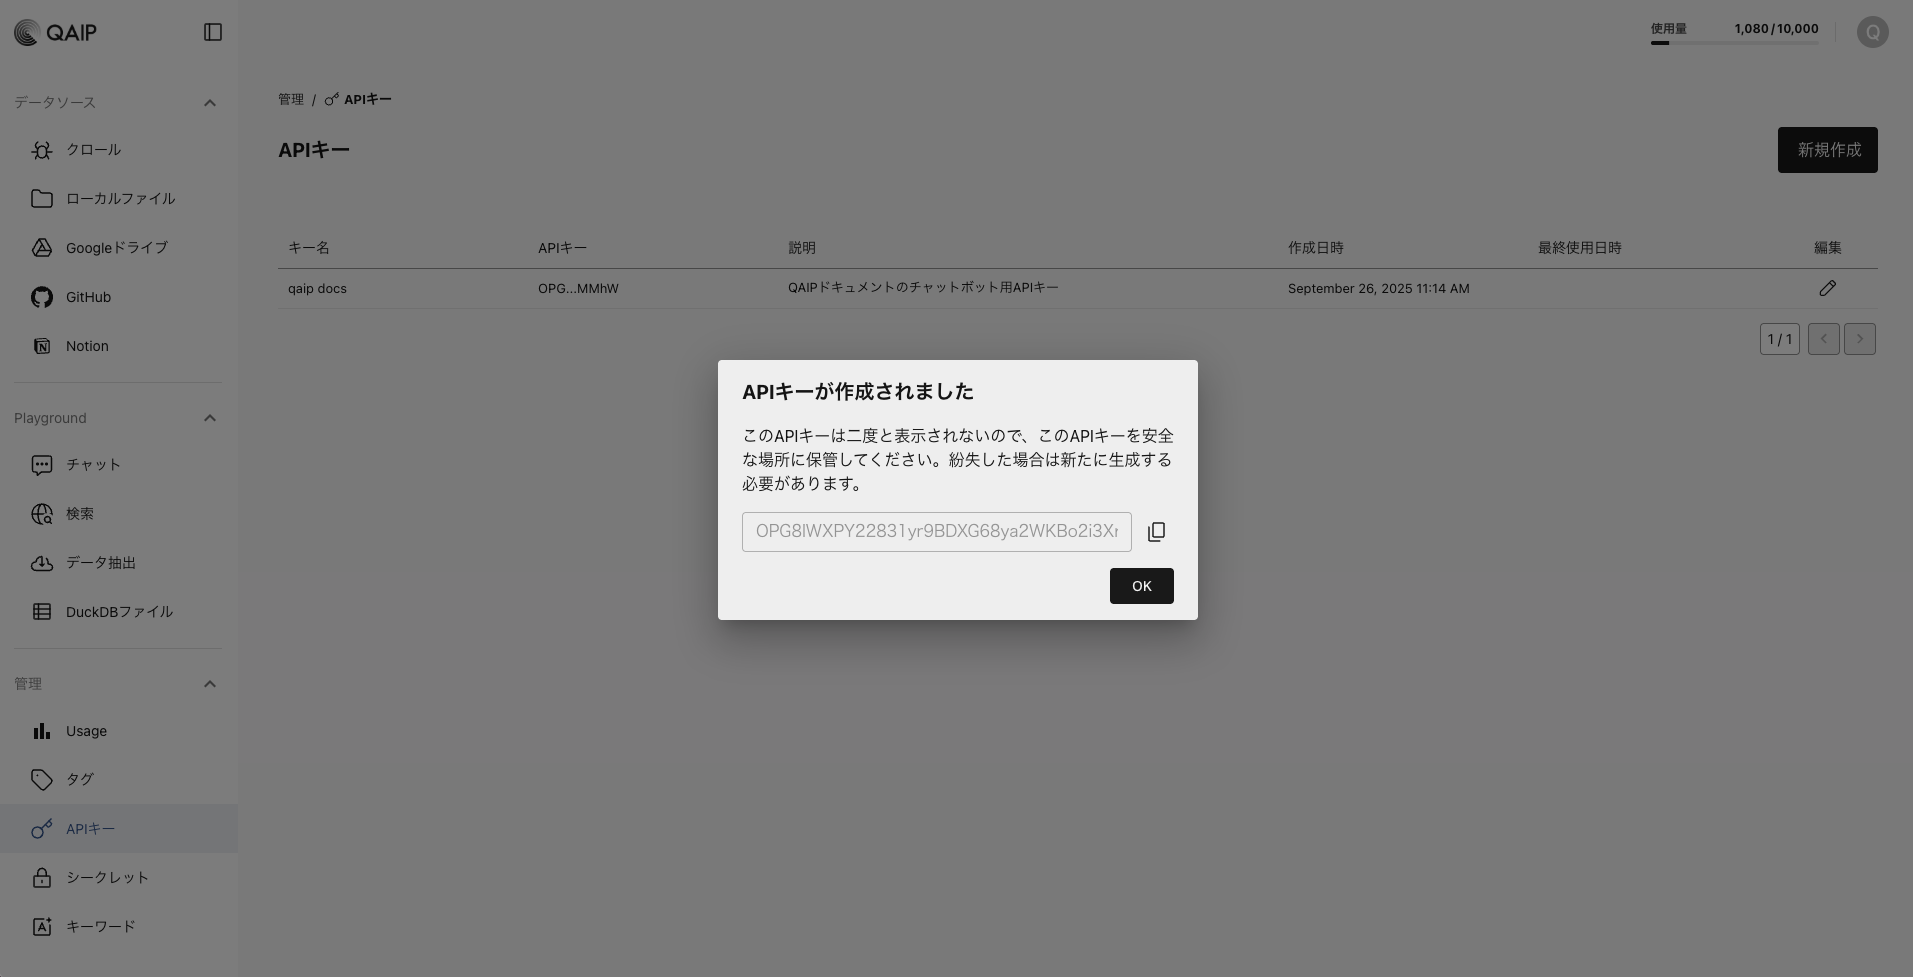
 APIキーが作成されるので、コピーしておきます。
 ### APIを呼び出す
作成したチャットボットを呼び出す方法を説明します。現在は下記の2つの方法があります。
1. QAIP Python SDKを使用する
2. 直接APIを呼び出す
#### 準備:環境変数の設定
APIキーは環境変数として設定することをお勧めします:
```bash theme={null}
# Linux/Mac
export QAIP_API_KEY="your-api-key-here"
# Windows
set QAIP_API_KEY=your-api-key-here
```
### インストール
QAIPのAPIを呼び出すためにSDKをインストールします:
```bash theme={null}
pip install qaip
```
### サンプルスクリプト
```python theme={null}
from qaip import Qaip
client = Qaip()
result = client.completion(
messages=[{"role": "user", "content": "QAIPの主な機能について教えてください"}],
citation=True,
)
for choice in result.choices:
print(f"Assistant: {choice.message.content}")
if choice.citations:
print("\n引用元:")
for i, citation in enumerate(choice.citations):
print(f"- {i+1}: {citation.url}")
```
ライブラリに依存せずにQAIPのAPIを利用することができます。
```bash theme={null}
curl -X POST https://developer.qaip.com/api/v1/completions \
-H "Content-Type: application/json" \
-H "x-api-key: $QAIP_API_KEY" \
-d '{
"messages": [
{ "role": "user", "content": "QAIPの主な機能について教えてください" }
],
"citation": true
}'
```
### APIを呼び出す
作成したチャットボットを呼び出す方法を説明します。現在は下記の2つの方法があります。
1. QAIP Python SDKを使用する
2. 直接APIを呼び出す
#### 準備:環境変数の設定
APIキーは環境変数として設定することをお勧めします:
```bash theme={null}
# Linux/Mac
export QAIP_API_KEY="your-api-key-here"
# Windows
set QAIP_API_KEY=your-api-key-here
```
### インストール
QAIPのAPIを呼び出すためにSDKをインストールします:
```bash theme={null}
pip install qaip
```
### サンプルスクリプト
```python theme={null}
from qaip import Qaip
client = Qaip()
result = client.completion(
messages=[{"role": "user", "content": "QAIPの主な機能について教えてください"}],
citation=True,
)
for choice in result.choices:
print(f"Assistant: {choice.message.content}")
if choice.citations:
print("\n引用元:")
for i, citation in enumerate(choice.citations):
print(f"- {i+1}: {citation.url}")
```
ライブラリに依存せずにQAIPのAPIを利用することができます。
```bash theme={null}
curl -X POST https://developer.qaip.com/api/v1/completions \
-H "Content-Type: application/json" \
-H "x-api-key: $QAIP_API_KEY" \
-d '{
"messages": [
{ "role": "user", "content": "QAIPの主な機能について教えてください" }
],
"citation": true
}'
```